Eclipse上开发简单Web项目
发表时间:2018-1-2
发布人:葵宇科技
浏览次数:49
本文是在Eclipse已经完成tomcat部署基础上进行讲述基本操作的,如果对tomcat部署相关知识有任何疑问的,可看我之前发表的有关tomcat部署相关的博文。
1.新建一个动态web项目
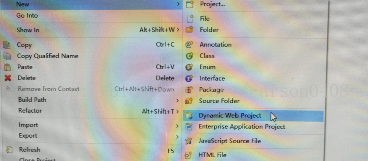
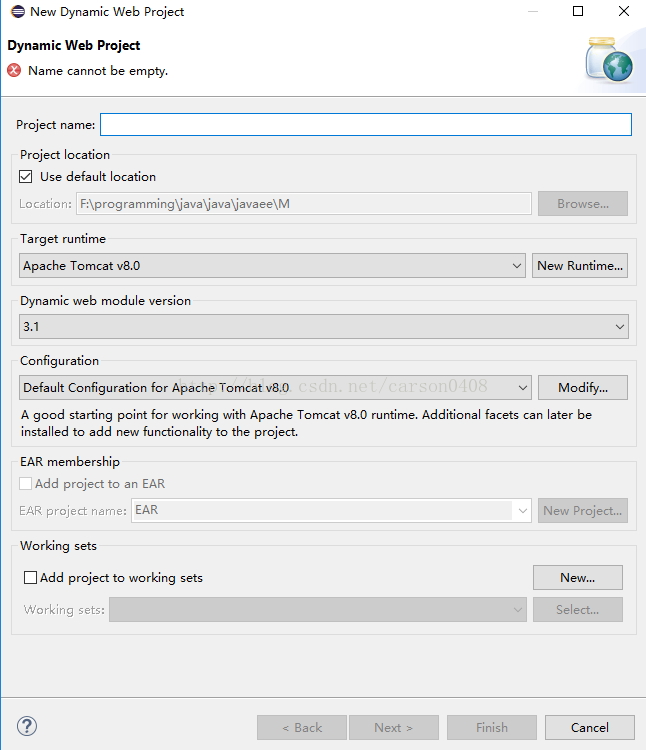
如图所示,直接在eclipse的project explorer空白处右键单击,选择new 然后点project web project,然后按在下图输入项目名字点finish即可。
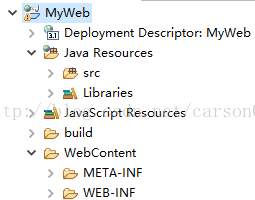
新建完成的项目结构如下图所示:
2.部署struts开发包
其中有一种是简单的复制方法:将需要的jar包从struts2.2.3.1/lib中复制到WebContent/WEB-INF/lib文件夹中。 此处介绍一种部署方法,部署之后,每次建立项目不需要每次都复制粘贴。如下图所示,右键单击WebContent中WEB-INF文件夹下的lib文件夹,选择Build path->configure Build path。
点击configure Build path之后按下图操作:
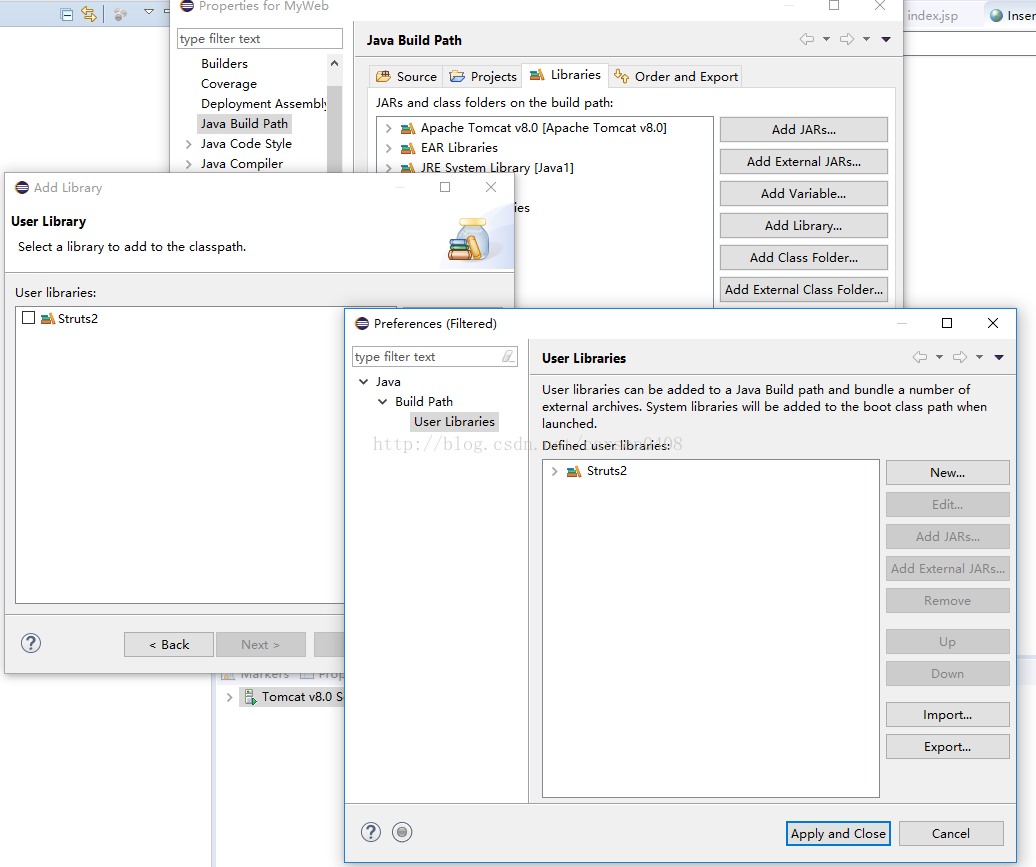
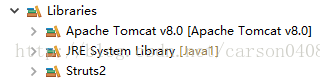
首先,如果libraries里没有struts2,则点右边的Add Library-->User libraries,假如仍然没有next,然后点new,新建一个library,并命名,然后点Add JARs,该步骤则是定位到struts安装包下的lib文件夹下相应的jars文件。全部部署之后,MyWeb项目下会出现一个Struts2的library,struts部署结束。如下图所示:
3.编写web配置文件web.xml
该配置文件大致没有什么其它不同,可以从其它web项目拷贝,只需要知道,该web配置文件需要配置一个struts的核心filter,而且语句一般固定,可以从其它地方复制。另外需要关联一个主jsp文件,该jsp页面则相当于网页的首页,如下图所示,index.jsp就是该项目的主页面。 web.xml:<?xml version="1.0" encoding="UTF-8"?>
<web-app xmlns:xsi="http://www.w3.org/2001/XMLSchema-instance" xmlns="http://xmlns.jcp.org/xml/ns/javaee" xsi:schemaLocation="http://xmlns.jcp.org/xml/ns/javaee http://xmlns.jcp.org/xml/ns/javaee/web-app_3_1.xsd" id="WebApp_ID" version="3.1">
<display-name>Struts</display-name>
<filter>
<filter-name>struts2</filter-name>
<filter-class>org.apache.struts2.dispatcher.ng.filter.StrutsPrepareAndExecuteFilter</filter-class>
</filter>
<filter-mapping>
<filter-name>struts2</filter-name>
<url-pattern>/*</url-pattern>
</filter-mapping>
<welcome-file-list>
<welcome-file>index.jsp</welcome-file>
</welcome-file-list>
</web-app>4.编写控制器文件struts.xml
struts文件主要用于将action与jsp页面相关联起来。比如有个action是welcome,它相对应的jsp页面是hello.jsp,则需要在struts文件中进行配置,将action名welcome,jsp页面,相对应的action函数进行关联起来。至于action函数,默认的话则是excute方法,若是其他方法,则应该在<action.../>中声明method变量,而welcome则是name值,而jsp页面则在<result.../>语句中表示清楚。 struts.xml:<?xml version="1.0" encoding="UTF-8"?>
<!DOCTYPE struts PUBLIC
"-//Apache Software Foundation//DTD Struts Configuration 2.0//EN"
"http://struts.apache.org/dtds/struts-2.0.dtd">
<struts>
<package name="default" namespace="/" extends="struts-default">
<action name="hello" class="ab.TestAction">
<result>/success.jsp</result>
</action>
<action name="reject" class="ab.TestAction" method="reject">
<result name="error">/reject.jsp</result>
</action>
</package>
</struts> 5.编写jsp文件
这里jsp文件分为两种,一种是主jsp文件,即前面讲述的index.jsp,这个文件是主页面,并给其他页面提供入口,给了其他页面与相关action相关联的切入点。 index.jsp:<%@ page language="java" contentType="text/html; charset=UTF-8"
pageEncoding="UTF-8"%>
<%@taglib prefix="S" uri="/struts-tags"%>
<!DOCTYPE html PUBLIC "-//W3C//DTD HTML 4.01 Transitional//EN" "http://www.w3.org/TR/html4/loose.dtd">
<html>
<head>
<meta http-equiv="Content-Type" content="text/html; charset=UTF-8">
<title>Insert title here</title>
</head>
<body>
<S:a action="hello">hello</S:a>
<br>
<S:a action="reject">reject</S:a>
</body>
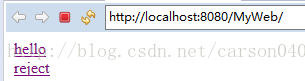
</html> index.jsp中则在<body..../>中部署了两个action,分别为hello,reject。这两个名字也将在主页面呈现。如下图所示;
正是有了以上两个action,则接下来需要编写相应的jsp文件,如下代码为两个jsp文件: success.jsp:
<%@ page language="java" contentType="text/html; charset=UTF-8"
    pageEncoding="UTF-8"%>
<%@ taglib prefix="s" uri="/struts-tags"%>
<!DOCTYPE html PUBLIC "-//W3C//DTD HTML 4.01 Transitional//EN" "http://www.w3.org/TR/html4/loose.dtd">
<html>
<head>
<meta http-equiv="Content-Type" content="text/html; charset=UTF-8">
<title>Insert title here</title>
</head>
<body>
    <s:property value="helo" />
    <br>
    <s:property value="res" />
</body>
</html> <%@ page language="java" contentType="text/html; charset=UTF-8"
pageEncoding="UTF-8"%>
<%@ taglib prefix="s" uri="/struts-tags"%>
<!DOCTYPE html PUBLIC "-//W3C//DTD HTML 4.01 Transitional//EN" "http://www.w3.org/TR/html4/loose.dtd">
<html>
<head>
<meta http-equiv="Content-Type" content="text/html; charset=UTF-8">
<title>Insert title here</title>
</head>
<body>
<s:property value="sorry" />
</body>
</html> 6.开发用于后台处理的Action
Action的编写十分重要,需要用于与其相对应的jsp页面相关联,通过Action函数的处理,呈现出相应的页面。 TestAction:package ab;
import com.opensymphony.xwork2.ActionSupport;
public class TestAction extends ActionSupport {
private static final long serialVersionUID = 1L;
private String helo;
private String res;
private String sorry;
public String getHelo() {
return helo;
}
public String getRes() {
return res;
}
public String getSorry() {
return sorry;
}
public void setHelo(String helo) {
this.helo = helo;
}
public void setRes(String res) {
this.res = res;
}
public void setSorry(String sorry) {
this.sorry = sorry;
}
@Override
public String execute() throws Exception {
helo = "hello,my name is carson!";
res="welcome to my blog!";
return SUCCESS;
}
public String reject() throws Exception
{
sorry="I'm sorry,this blog is secret!";
return ERROR;
}
} 上面的java文件中有两个函数,一个是excute,这是默认的action,另一个是reject,是需要声明的。
7.部署web项目
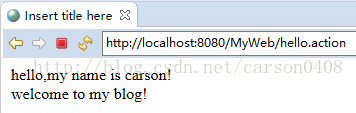
右键单击项目文件夹,然后选择Run As,再选择Run alt="" />选择上图中的hello,则会呈现下图所示的内容:
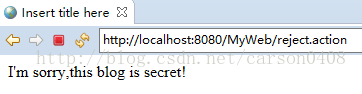
选择reject,则会出现下图所示的内容:
注:如果部署项目报错,并出现:HTTP Status 404 - There is no Action mapped for namespace [/] and action name [regist_Action] associated with context path [/wildcard1].相关字样,可以通过如下方法解决:window->preferences->Java->Compiler->Building,然后将abort build when build path errors occur前的勾取消即可。
以上便是在Eclipse上开发web项目的整体流程。