SpringBoot实现微信小程序登录功能
发表时间:2020-10-19
发布人:葵宇科技
浏览次数:38
SpringBoot实现微信小程序登录
- 微信小程序登录流程
- 登录流程图
- 前端代码
- 后端代码
微信小程序登录流程
微信小程序官方文档:微信小程序官方文档
第一次学习微信小程序的登录,以前也好奇微信小程序的授权登录是怎么实现的,看过官方文档后,这里记录下自己学习小程序登录的实现内容。要是有不对的地方请指出来,这篇文章适合和我一样的小白看。算是简单的入个小门。
登录流程图
根据流程图的说明,首先是微信小程序的前端调用wx.login()接口获取到code值,然后前端使用wx.request()或者前端自己封装的请求,来调用后台自己写的登录接口,比如:login接口,后台接收到前端传来的code值后,后台要调用微信接口服务里面的jscode2session接口,官方文档有说明,详情可看官方文档,这个jscode2session接口会返回session_key和openid等值,一般是这二个值,unionid看满足条件返回,然后后端在接收到这2个值后,看根据需要是否要加其他返回值,比如:token等,这里加token就是所说的自定义登录态,然后将这些值返回给前端,前端接收到返回值后,自定义登录态存入storage,大致登录就是这样。

前端代码
这里你最好自己去微信公众平台:微信公众平台上面自己注册一个微信小程序,用的测试号好像没有secret值,所以后台根本没办法正确获取到openid值和session_key值,自己注册了微信小程序后,你会有一个appId和secret这2个值,同时还有密钥,这个以后再说。
这里我是自己用微信开发者工具新建的微信小程序项目,没有加任务的东西,目录如下:

这里再app.js文件加上wx.request()代码,代码如下:

App.js
//app.js
App({
 >: function () {
    // 展示本地存储能力
    var logs = wx.getStorageSync('logs') || []
    logs.unshift(Date.now())
    wx.setStorageSync('logs', logs)

    // 登录
    wx.login({
      success: res => {
        // 发送 res.code 到后台换取 openId, sessionKey, unionId
        wx.login({
          success (res) {
            if (res.code) {
              //发起网络请求
              wx.request({
                url: 'http://localhost:8080/WXLogin/login?code='+res.code,
                data: 'code='+res.code,
                method: "post",
                success: res => {
                  console.info(res.data);
                },
                fail:res => {
                  console.info("失败");
                  console.info(res.data);
                }
              })
            } else {
              console.log('登录失败!' + res.errMsg)
            }
          }
        })
      }
    })
    // 获取用户信息
    wx.getSetting({
      success: res => {
        if (res.authSetting['scope.userInfo']) {
          // 已经授权,可以直接调用 getUserInfo 获取头像昵称,不会弹框
          wx.getUserInfo({
            success: res => {
              console.log("成功2!");
              // 可以将 res 发送给后台解码出 unionId
              this.globalData.userInfo = res.userInfo

              // 由于 getUserInfo 是网络请求,可能会在 Page.onLoad 之后才返回
              // 所以此处加入 callback 以防止这种情况
              if (this.userInfoReadyCallback) {
                this.userInfoReadyCallback(res)
              }
            }
          })
        }
      }
    })
  },
  globalData: {
    userInfo: null
  }
})
后端代码
可能需要的依赖
		<dependency>
            <groupId>com.alibaba</groupId>
            <artifactId>fastjson</artifactId>
            <version>1.2.47</version>
        </dependency>
后台发送get或者post请求的工具类
WeChatUtil.java 代码如下:
package com.bowei.officialwebsite.utils;

import com.alibaba.fastjson.JSONObject;
import lombok.extern.slf4j.Slf4j;
import javax.net.ssl.HttpsURLConnection;
import java.io.*;
import java.net.URL;
import java.net.URLConnection;
import java.nio.charset.StandardCharsets;

/**
 * 微信小程序工具类
 */
@Slf4j
public class WeChatUtil {

    public static String httpRequest(String requestUrl, String requestMethod, String output) {
        try {
            URL url = new URL(requestUrl);
            HttpsURLConnection connection = (HttpsURLConnection) url.openConnection();
            connection.setDoOutput(true);
            connection.setDoInput(true);
            connection.setUseCaches(false);
            connection.setRequestMethod(requestMethod);
            if (null != output) {
                OutputStream outputStream = connection.getOutputStream();
                outputStream.write(output.getBytes(StandardCharsets.UTF_8));
                outputStream.close();
            }
            // 从输入流读取返回内容
            InputStream inputStream = connection.getInputStream();
            InputStreamReader inputStreamReader = new InputStreamReader(inputStream, StandardCharsets.UTF_8);
            BufferedReader bufferedReader = new BufferedReader(inputStreamReader);
            String str;
            StringBuilder buffer = new StringBuilder();
            while ((str = bufferedReader.readLine()) != null) {
                buffer.append(str);
            }
            bufferedReader.close();
            inputStreamReader.close();
            inputStream.close();
            connection.disconnect();
            return buffer.toString();
        } catch (Exception e) {
            e.printStackTrace();
        }
        return "";
    }

    /**
     * 向指定 URL 发送POST方法的请求
     *
     * @param url  发送请求的 URL
     * @param json 请求参数,请求参数应该是 json 的形式。
     * @return 所代表远程资源的响应结果
     */
    public static String httpPost(String url, JSONObject json) {
        PrintWriter out = null;
        BufferedReader in = null;
        String result = "";
        try {
            URL realUrl = new URL(url);
            // 打开和URL之间的连接
            URLConnection conn = realUrl.openConnection();
            // 设置通用的请求属性
            conn.setRequestProperty("accept", "*/*");
            conn.setRequestProperty("connection", "Keep-Alive");
            conn.setRequestProperty("user-agent",
                    "Mozilla/4.0 (compatible; MSIE 6.0; Windows NT 5.1;SV1)");
            // 发送POST请求必须设置如下两行
            conn.setDoOutput(true);
            conn.setDoInput(true);
            // 获取URLConnection对象对应的输出流
            out = new PrintWriter(conn.getOutputStream());
            // 发送请求参数

            out.print(json);
            // flush输出流的缓冲
            out.flush();
            // 定义BufferedReader输入流来读取URL的响应
            in = new BufferedReader(
                    new InputStreamReader(conn.getInputStream()));
            String line;
            while ((line = in.readLine()) != null) {
                result=result.concat(line);
            }
        } catch (Exception e) {
            System.out.println("发送 POST 请求出现异常!" + e);
            e.printStackTrace();
        }
        //使用finally块来关闭输出流、输入流
        finally {
            try {
                if (out != null) {
                    out.close();
                }
                if (in != null) {
                    in.close();
                }
            } catch (IOException ex) {
                ex.printStackTrace();
            }
        }
        return result;
    }

}
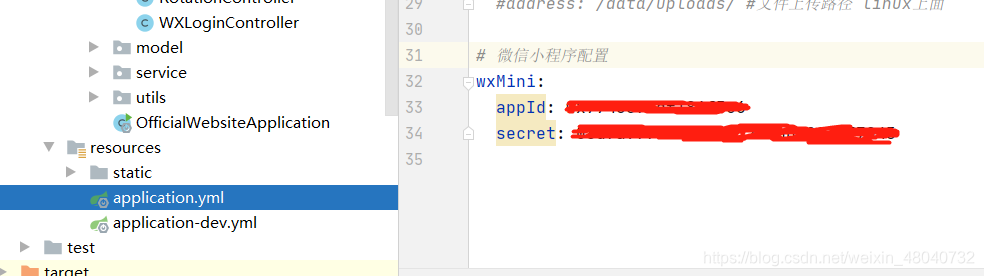
在application.yml下配置微信小程序的appId和secret,这样方便以后修改和维护
后端接口代码:
CommonResult 是自己封装好的一个json返回对象,自己封装的会返回code,message,data这三个值,这里你可以直接返回jsonObject。
package com.bowei.officialwebsite.controller;

import com.alibaba.fastjson.JSONObject;
import com.bowei.common.api.CommonResult;
import com.bowei.officialwebsite.utils.WeChatUtil;
import com.github.pagehelper.util.StringUtil;
import io.swagger.annotations.Api;
import io.swagger.annotations.ApiOperation;
import lombok.AllArgsConstructor;
import org.springframework.beans.factory.annotation.Value;
import org.springframework.stereotype.Controller;
import org.springframework.web.bind.annotation.RequestMapping;
import org.springframework.web.bind.annotation.RequestMethod;
import org.springframework.web.bind.annotation.RequestParam;
import org.springframework.web.bind.annotation.ResponseBody;

@Api(tags = "WXLoginController", description = "微信登录模块")
@Controller
@RequestMapping(value = "/WXLogin")
public class WXLoginController {

    @Value("${wxMini.appId}")
    public String appId;
    @Value("${wxMini.secret}")
    public String secret;

    @ApiOperation("登录")
    @RequestMapping(value = "/login",method = RequestMethod.POST)
    @ResponseBody
    public CommonResult login(@RequestParam(value = "code", required = false) String code){
        System.out.println("code==="+code);
        if(StringUtil.isEmpty(code)){
            return CommonResult.failed("code不能为空!");
        }
        System.out.println("appId="+appId+"|| secret="+secret);
        //微信接口服务,通过调用微信接口服务中jscode2session接口获取到openid和session_key
        String url = "https://api.weixin.qq.com/sns/jscode2session?appid=" + appId + "&secret=" + secret + "&js_code=" + code + "&grant_type=authorization_code";
        String str = WeChatUtil.httpRequest(url, "GET", null);
        JSONObject jsonObject=JSONObject.parseObject(str);
        //将token也加进去  先写个假的
        jsonObject.put("token","sfskjnkjs3231311");
        System.out.println("json="+jsonObject);
        System.out.println(jsonObject.get("token"));
        return CommonResult.success(jsonObject);
    }
}
后端打印结果:

前端返回结果:
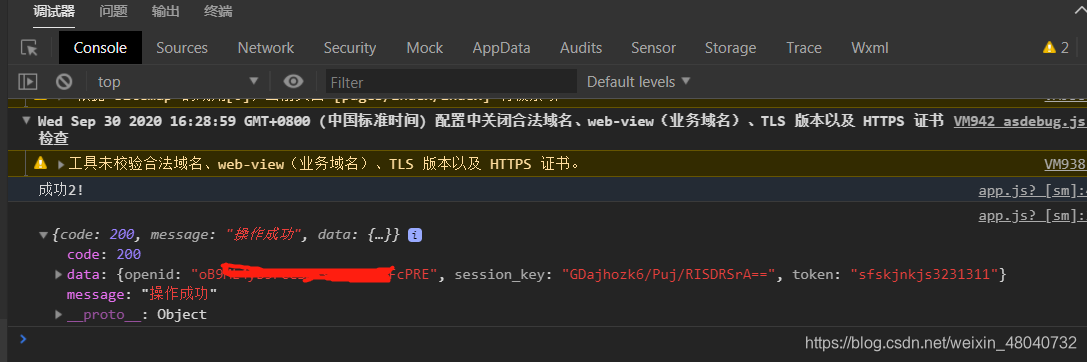
到这里登录的代码就结束了,这里主要显示后端的代码,毕竟本人是后端,对微信小程序不太熟悉,好了,自己的学习分享就到这里了,希望对各位有帮助吧。